-
Shop
- Adidas
- Advanced Technologies
- AI Skills Mastery 2026 Collection
- Apple Accessories
- Best-Sellers
- Car Accessories
- Dating & Social Confidence
- Dating & Social Skills
- Digital Resources
- Education & Learning
- Family & Parenting
- Fashion
- Fashion Accessories
- Furniture
- Gadgets
- Health & Beauty
- Health & Wellness
- Home & Garden
- Home Supplies
- Kids & Babies
- Kitchen Best-Sellers
- Lighting
- Nike
- Patio, Lawn & Garden
- Personal Growth
- Pet Care
- Pet Supplies
- Pets
- Shoes
- Sport & Outdoors
- Stress Relief & Relaxation
- Summer 2025 Fashion Collection
- Sunglasses
- Super Deals
- Travel
- Travel & Outdoors
- Wealth
- Wealth Building
- Women’s Wellness & Lifestyle
- Popular
- Best deals
60PCS Resin Cookie Nail Charms: Cute 3D Biscuit Accents
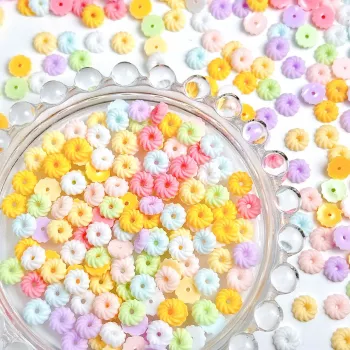
60PCS Multi-color Resin Cookie Nail Charms: Sweet, Textured Nail Art Without the Fuss
Add a playful dessert-inspired touch to manicures with multi-color resin cookie charms. This 60-piece set is made for quick accents on gel, acrylic, press-ons, and craft projects—ideal for mixing colors, building themed sets, and creating textured “3D” nail looks without complex sculpting. Whether you lean into soft milk-tea neutrals or bright, candy-like color palettes, these mini biscuit charms make it easy to turn a simple manicure into a photo-ready set.
What’s Included and What They’re Like
This set includes 60 mini resin cookie/biscuit-style charms in assorted colors, giving plenty of variety for different moods and matching sets. The overall vibe is cute snack/dessert—great for pastel looks, kawaii styling, birthday nails, or a cozy “tea time” manicure. Because they’re resin, they’re lightweight with a hard finish and meant to sit on top of the nail as a true 3D charm (rather than blending in like glitter or confetti).
Beyond nails, they also work well for small DIY projects like phone case decoration, scrapbook accents, and other crafts where you want a raised, colorful detail.
| Feature | Details | Why it matters |
|---|---|---|
| Quantity | 60 pieces | Enough to create multiple sets and experiment with layouts |
| Material | Resin | Lightweight texture and bold color; best attached with gel or nail glue |
| Style | Cookie/biscuit mini charms | Instant theme without hand-sculpting |
| Color mix | Multi-color assortment | Easy to coordinate with different base colors |
| Placement | Top of nail / accent areas | Works well as one or two statement nails per hand |
If you’re ready to build a dessert-themed set, you can find the charms here: 60PCS Multi-color Resin Cookie Nail Charms – Cute Mini Biscuits for DIY Nail Art.
Best Nail Looks to Pair with Cookie Charms
The easiest way to make 3D charms look intentional is to pair them with a clean base and repeat a small detail (like a dot “sprinkle” pattern) across the set. A few combinations that look polished without feeling overdone:
- Milk-tea nude base: Keep most nails sheer nude or beige and place one cookie charm on each ring finger for a subtle dessert accent.
- Pastel French tips: Use soft tips (pink, lavender, mint) and center a contrasting cookie charm near the cuticle line on one or two nails.
- “Bakery box” mix-and-match: Rotate charm colors across hands, then add tiny dots or micro “sprinkles” using gel paint to tie everything together.
- Party texture: Choose a glossy topcoat, then place charms on two nails per hand for a fun, high-shine 3D finish.
- Kids/teen-friendly sets: Use bright solids (no complex gradients) so the charm stays the star and the manicure still looks neat.
For a complete self-care moment—fresh nails plus a fresh blowout—pair your nail session with a styling tool like the 6-in-1 Hair Dryer Brush & Curling Iron Set – Ionic Hot Air Styler for All Hair Types.
How to Apply 3D Charms So They Stay Put
3D charms can last surprisingly well when the base is prepped and the adhesive matches your manicure type. The goal is strong contact under the charm plus a sealed “frame” around the edges to reduce lifting.
1) Prep your base
- Finish your base color and cure fully.
- If your gel system leaves an inhibition (tacky) layer and placement feels slippery, wipe it so positioning stays predictable.
2) Test placement before committing
- Use tweezers or a wax pencil to pick up the charm.
- Set it on the nail first to check spacing, direction, and how it looks from different angles.
3) Choose the right adhesive
- Thick builder gel: Great for gel manicures and for filling small gaps under the charm.
- Rhinestone gel: Specifically designed for staying power with raised embellishments.
- Nail glue: Works well for regular polish or quick press-on designs (let it set fully before sealing).
4) Seal without burying detail
- Apply topcoat around the charm edges to “frame” it and reduce snagging.
- Avoid flooding over taller charms if it dulls the cookie detail; sealing the perimeter is usually enough.
- Cure gel thoroughly according to your lamp instructions; if using glue, wait for full dry time before topcoating around the edges.
Comfort, Wear Time, and Practical Tips
Because cookie charms are raised, small placement changes can make a big difference in comfort and longevity.
Care, Removal, and Nail Safety Basics
For general nail care guidance, see the American Academy of Dermatology Association – Nail care basics. For additional product and safety information, the FDA – Nail care products and safety information is also a helpful reference.
Gifting and Theme Ideas
FAQ
Do resin nail charms work with regular nail polish?
Yes, they can work with regular polish, but they usually hold best with nail glue after the polish is fully dry. For the most secure wear, builder gel or rhinestone gel tends to grip 3D charms more reliably.
How many nails should use 3D charms for a balanced look?
One or two accent nails per hand is a common choice for a balanced design and better day-to-day comfort. Using charms on every nail can feel bulky and may snag more easily.
Can these be used on press-on nails?
Yes—attach the charm to the press-on first using gel or a strong glue, then seal around the edges. After it’s secure, apply the press-on to your natural nail for easier placement and improved durability.













Leave a comment